Important note
for Secwin Users. Secwin 3.47 or later required. Download Latest Secwin
here.
Important note for
Tearoff Users. TearOff 1.89 or later required. Download Latest TearOff
here.
Source Code Policy
We have chosen to ship Makeover as source code, rather
than as a compiled DLL. This makes it much easier for you to modify, but
it also makes it much easier for you to pirate. We ask you to please
consider the effort involved in writing this product, before you choose to
hand it on to any other developers. If you received this program illegally
(i.e. if you didn't pay for it, or you didn't buy it from
CapeSoft,
ClarionShop,
or one of their respective dealers) then we ask you to contact us so that
we can remedy this situation. Without the revenue generated from products
such as this it is impossible for us to create new products.
We welcome any suggestions from users regarding new features that might be
added to Makeover.
License & Copyright
This template is copyright © 2025 by CapeSoft
Software. None of the included files including
Makeover.Htm,
Makeover.Clw,
Makeover.Inc
or
Makeover.Tpl may be distributed.
The sample Style file (
style.ini), and
sample graphics files(*.BMP, *.WMF and *.CUR) can be freely distributed.
Each developer needs his own license to use Makeover. (Need to
buy more licenses?)
This product is provided as-is. CapeSoft Software and CapeSoft Electronics
(collectively trading as CapeSoft), their employees and dealers explicitly
accept no liability for any loss or damages which may occur from using
this package. Use of this package constitutes agreement with this license.
This package is used entirely at your own risk.
Use of this product implies your acceptance of this, along with the
recognition of the copyright stated above. In no way will CapeSoft , their
employees or affiliates be liable in any way for any damages or business
losses you may incur as a direct or indirect result of using this product.
For the full EULA see
https://capesoft.com/eula.htmlSupport
Your questions, comments and suggestions are welcome.
Check our web page (
www.capesoft.com/accessories/downloads.htm)
for new versions. You can also contact us in one of the following ways:
| CapeSoft Support |
| Email |
 |
| Telephone |
+27 87 828 0123 |
| Post |
PO Box 511, Plumstead, 7801, Cape Town, South Africa |
| CapeSoft Sales |
| Web |
www.capesoft.com
|
| Email |
 |
| Telephone |
+27 87 828 0123 |
| Post |
PO Box 511, Plumstead, 7801, Cape Town, South Africa |
Installation
Run the supplied installation file.
Note : Makeover now ships with many
different sample styles. These are installed into your \Clarion\Accessory\Images\Styles
folder.
Makeover JumpStart
[read this bit if you're in a
hurry]
- Install as per the instructions above
- Add the Makeover global extension to your application
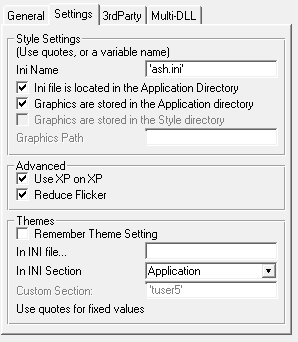
- Set the global Extension settings as per this picture
- Copy the contents of \clarion\accessory\images\styles\ash
to your application folder.
- Compile and run the program.
Introduction
Do you remember those good looking DOS programs you
used to write? Do you remember your first color monitor? Do you remember
the difference color made to those applications? Remember the excitement
of getting a graphical interface? And as time has progressed you've got
more and more colors at your disposal. So why do our programs look so
gray?
With one voice I hear you chorus - "It's the Windows standard". That's
right. The idea was, if everything looked the same then users would learn
your program easier. Well almost. Actually Windows encouraged programs to
work the same (i.e. menus, buttons, windows etc.). The look has
changed quite a lot over the years. Don't believe me? Go back and check
out an old Windows 3.0 program. Or check out one of your own Windows
programs from say 3 years ago.
Even the 'Gray' standard isn't so standard anymore. Part of Quicken's
success has been attributed to their innovative, and friendly user
interface. And Microsoft Money has recently followed suit. And of course,
we don't need to talk about the interfaces that come with CD-ROM programs
(Encyclopedias, Games, Reference CD's etc.) or Web sites - these have all
moved far away from the Gray 'standard'. Also, with the advent of the Web,
users are used to color and texture.
Of course, the real reason for staying with plain vanilla programs, is the
amount of effort involved. It's a lot easier to keep screens simple,
rather than go to a lot of effort of making them 'pretty' and consistent.
And of course, if you want to change your look halfway through, it's
simply hard work (well by Clarion standards anyway)! To top it off this is
all well and good if your client has his screen set to a bunch of colors,
but what if he hasn't? Then your carefully crafted screens look like
garbage.
To answer this need we wrote the Makeover template. This template
dynamically, at runtime, applies a set of 'style' features to your
screens. And each style set contains 3 different settings. One for 16
colors, one for 256 colors, and one for more then 256 colors. Makeover
automatically detects which version is best optimized for your client, and
applies that set.
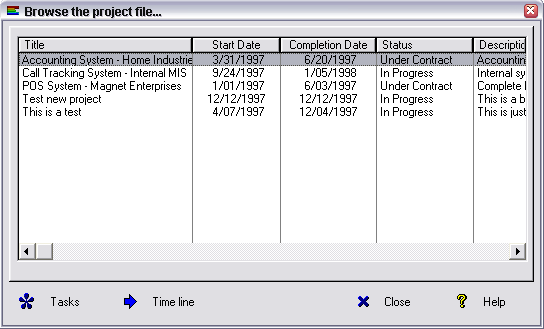
Here are two small, simple screen shots - as an example - taken from the
same app, before and after Makeover was applied. (I've made the window
quite small to speed up viewing.) Need I mention that the last shot is
best viewed with your computer set to more than 256 colors?
Before ...
 After ...
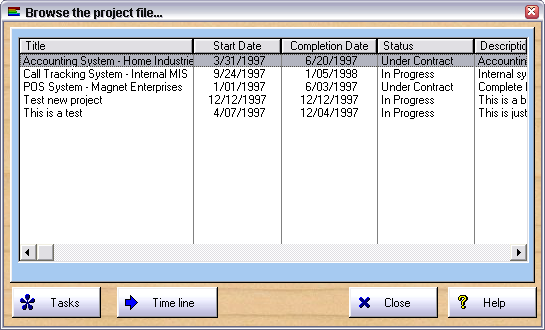
All of the above settings are done at runtime.
Since we released version 1.0 we've had a huge response, both in sales and
also in feedback. A lot of what has been added in versions 1.1 to 1.3 are
a direct result of this - it seems I wasn't alone in thinking the apps
could look better. Of course we're not there yet, so keep the suggestions
coming. Also if you have any graphics, textures or meta-files which you
think might be of interest to the community at large (and you have rights
to distribute them) then send them through and we'll include them in
future releases.
In version 2 we've refined a lot of the settings, mostly adding you even
more control. The Styler utility has been vastly improved (not least
because we used it to create all the new styles.) Yes we finally got it -
programmers out there are as bad at creating styles as anyone. So we got a
graphics person to put together 10 styles for us, and these are now
included. The new styles can be found in
\Clarion\3rdparty\images\styles
along with a big selection of button styles and toolbar styles.
Acknowledgements
As usual this effort has been enhanced considerably by
the input of existing users. Our thanks (in no particular order) go to
Edward Grodsky, Alan Beames, Tony York, Steve Lewis, Bram Klootwijk &
Glenn Rathke, as well as all the others who reported a bug, or made a
suggestion.
Features
- Automatic detection of color depth on end-user machine
- Allows for graphical, or colored, backgrounds to windows, including
MDI frame
- Allows for making all, or just some, of your buttons 'flat'
- Allows you to turn your buttons into 'Cool Buttons'
- Allows for colored tabs - including different colors for active and
inactive tabs
- Allows you to set Entry and List box colors for each window type
- Includes pre-packaged styles
- Allows your user to select their own Theme of choice
- Style Editor
How it Works
Makeover lets you differentiate between different
kinds of screens in your program. There is a different style set for each
screen type. For example, you can apply one set of settings to all your
Browse screens, and another to all your Form screens. Your Wizards may
look different to your Lookups and so on. Makeover allows for up to 16
different types of screens.
You store your preferred look in a style file. This is a simple ini file,
and contains all the settings for each kind of screen. In addition it
contains a complete style set for 16, 256 or more then 256 color depths. A
sample Style.Ini file ships with Makeover.
When your program runs it loads the current style settings. Makeover
automatically determines the color depth of the computer, and then uses
either set 1 (16 colors), set 2 (256 colors) or set 3 (more than 256
colors).
After each window is opened a call is made for Makeover to apply it's
magic to the screen. Using the screen type (i.e. is it a Browse or a Form,
or whatever), Makeover applies the correct settings.
Adding Makeover to your Application
First
Adding Makeover to your application is easy. Simply
add the Makeover Global extension to your Global extensions. To do this;
- Open the Clarion Environment, and load your App file.
- Click on the Global button.
- Click on Extensions
- Click on Insert
- Select the Activate Makeover global
extension from the list. Fill in the options. You can find a
detailed explanation of each option in the next section ( here
).
Second
Then you need to copy one, or more styles, and their
graphics to the directories you've specified. For example, if you've set
your style file, and graphics, to both use the application directory,
then copy one or more styles to that directory.
Multi-DLL
If you have a multi-app system, then add Makeover to
the system in the following way;
- Data DLL (ie the one which exports ABC and the File declarations)
Add the Makeover extension - On the Multi-DLL Tab make sure both
settings are on
- All other DLL's
Just add the Makeover global Extension. On the Multi-DLL tab the
defaults should be correct (first option is on, second is off)
- In the Exe
Add the Makeover extension, and set the settings on the Settings
tab.
On The Multi-DLL Tab set "This is part of a Multi-DLL" app ON, but
the "Export" option OFF.
Optional
Makeover Local Procedure
Extension
The global extension will automatically add the Makeover local extension
to all your windows. By default Makeover will use the Procedure template
to determine the correct Window type. However you may want to override
the setting on some windows where the type is not the same as the
Template. For example if you're using a Browse template, but creating a
Lookup screen, and you want your Lookups to look different to Browses,
then you'll need to set your Lookup screen to use the Lookup settings.
You can do this by adjusting the setting on the Makeover extension, on
that particular screen.
At this point go ahead and compile.
Global Extension Options
| General Tab |
Disable All Makeover Features |
Select this if you need to disable Makeover in this app, but
without losing all your other settings. |
Settings Tab
(in multi DLL systems the first part of this tab only appears in
the EXE) |
Ini Name |
The name of the default style ini file. See the section a little
later on Naming the Ini file for more
advanced information about the ini file. |
|
Ini file is located in Application directory |
Click this on if you install the style into the Application
directory. If this is off then the Windows directory is used.
Storing in the application directory is easier, but if you store
in the Windows directory then users on the network can edit their
own styles without affecting each other. |
|
Graphics are stored in the Application directory. |
Allows you to default the graphics to the application directory. |
|
Graphics are stored in the Style Directory |
This is available if the option above is not ticked. A good
strategy in general is to keep the graphics files with the style
files. If you tick this option on the Makeover will automatically
match the graphics directory to the Style directory. |
|
Graphics Path |
If not in the application directory then you can specify a path
to the graphics. |
|
Use XP on XP |
Turns on support for Windows XP (and Windows Vista) Manifest
files. See Windows XP for more
information. |
|
Reduce Flicker |
This set the Window{prop:buffer} = 1 for all windows. This can
make window redrawing smoother, at the expense of some RAM. |
|
Remember Theme Setting |
If you have allowed the user to select their own themes, then if
you click this on the theme they select will be stored. Otherwise
it will always revert to your default theme on startup. |
| Multi-DLL Support |
This is part of a Multi-DLL application |
Tick this on if this app is part of a Multi-DLL project. (Do
this for all DLL's and EXE's) |
|
Export Makeover object declared in this DLL |
Tick this on only if this DLL is the "Data DLL" in your system |
Local Extension Options
| General Tab |
|
|
|
Disable Makeover in this procedure. |
|
|
Treat this as a : |
Allows you to override the detected style setting for the
window. |
|
Treat Query window as a : |
If the window is a browse, and has a QBE button, then the the
style you choose here will apply to the popup QBE window |
|
If browse called as lookup, use lookup style |
Allows your browse to adopt 2 styles. One if called in "browse"
mode, but another if called in "select" mode. |
|
Reduce Flicker |
Ticking this on can reduce flicker on complex windows. |
|
Show Selected |
If this is on then the button with the focus will be
highlighted. If no button has focus then the first "Default"
button will be highlighted. |
| Solid Controls Tab |
|
This tab allows you to override the controls that must not be
set to transparent when Makeover applies the style to the window. |
| Overrides Tab |
Wallpaper |
Allows you to override the wallpaper for this procedure. |
|
Wallpaper Mode |
Allows you to set the wallpaper mode for this procedure. |
|
Disable Cool Buttons |
|
|
Flat / Trn / Skip controls |
Controls in this list will be set as Flat, Transparent and Skip.
The background control created by Makeover (if any) will be
destroyed. |
Shipping your Makeover Application
Ok, so now you're ready to ship your application.
You'll need to remember to include the following files;
- One or more of your Style ini files.
- Any graphic files which your app uses, which are not linked into
your application. See Linking Resources into your
application for details on linking graphics into your
application. Note that Styler can display a ship list for a style so
you know which files to ship.
Makeover does not make use of any other DLL or LIB files.
Editing
a Style File by Hand
- Note :
This next bit is optional and is only here for advanced users.
If you don't want to use Styler then use the following instructions.
To edit the Style.Ini open it with any text editor. Because the ini
file supports 3 different color depths, and 16 window types, a maximum
of 45 different setting groups are therefore in the file. Each group
is in a section. The sections are named as follows;
[BasicNWinType] Where N is a number from 1 (16
colors), to 3 (more than 256 colors). WinType is one of the standard
Makeover Window types.
There are a number of settings for each window type, which are
detailed here;
- ActiveTabColor: This is the color to use on Active tabs.
- ActiveTabFontColor: This is the color to use for the text
on Active tabs.
- BackgroundColor: This is a color to use as the background
color for the window. If there is wallpaper, and the wallpaper is
either stretched or tiled, then this color won't be visible.
- ButtonCursor: This is a cursor to use for the button. For
example by using the included Hand.Cur then the cursor will change to
a hand when moving over a button. This is similar to the way the
cursor changes in a web browser when moving over a clickable object.
Cursors must be embedded in your application - they cannot be stored
separately in a .Cur file. See Linking Resources
into your application for details.
- ButtonFontColor : The font color that the text will
appear on buttons.
- CoolButtons: 0 = Off ; 1 = On. Coolbuttons have a
graphical background, in addition to the normal icon and text.
Coolbuttons are not suitable for color modes of 256 colors or 16
colors.
- CoolButton: This is the graphic to use for the cool
buttons. The graphic is automatically stretched to the same size as
the button. If you use the included cool.wmf here then the
buttons appear to have a sculptured look. Very Cool! You can use a
graphic file on the disk, or a graphic embedded in your application.
See Linking Resources into your application
for details.
- CoolButtonSelected: This is the graphic to use for a cool
button when it is selected. The graphic is automatically stretched to
the same size as the button. If you use the included button.gif
here then the buttons appear to have a sculptured look. Very Cool! You
can use a graphic file on the disk, or a graphic embedded in your
application. See Linking Resources into your
application for details.
- DisableEntries : Turn off the flat, rounded entry boxes
on this window type
- DisableLists : Turn off flat, rounded list boxes on this
window type.
- EntryColor: This is the color to use for Entry controls,
Spinboxes and Textboxes.
- FlatButtons: 0 = Off ; 1 = On .I recommend using Flat
buttons on a Frame (i.e. the Toolbar contains flat buttons) but
elsewhere use normal buttons.
- GridColor: The color of grid lines used in list boxes.
- InactiveTabColor: This is the color to use on Inactive
tabs.
- InactiveTabFontColor: This is the color to use for the
text on Inactive tabs.
- ListColor: This is the background color to use for List
controls.
- ListFontColor : This is the default font color to use
for the list (for unselected rows).
- ListSelectedFillColor : The color of the highlight bar in
a list box.
- ListSelectedFontColor : The color of the text in the
highlight bar in a list box.
- ListLineHeight : The height of lines in your listboxes.
- ReadOnlyColor: This is the color to use for ReadOnly
Entry, Spin and Text controls. This allows your read-only controls to
have a different color to editable controls.
- SelectedEntryColor: This is the color to use for Entry
controls, Spinboxes and Textboxes as they are selected (to highlight
the control that is selected).
- TransparentSheet : 0 to make it non-transparent,
otherwise the sheets are made transparent
- TextFontColor : The font color that is used for text in
text controls.
- TextFontColor : The font color that is used for text in
text controls.
- WallPaper: This is the name of a graphic to use for
background wallpaper for this window type. All the usual Clarion
graphic types are supported including BMP, GIF, JPG and WMF. Wallpaper
is only recommended in more then 256 color mode. For 16 color, and 256
color modes leave this blank. You can use a graphic file on the disk,
or a graphic embedded in your application. See Linking
Resources into your application for details.
- WallPaperType : 0 = Stretch, 1 = Centered, 2 = Tiled.
This is what to do with the wallpaper mentioned above. If there is no
wallpaper then this setting is ignored.
The following properties are included only for the Frame window type.
- ToolBarBackground : A graphic file containing the wallpaper for the
toolbar.
- ToolBarBackgroundType : 0 for stretched, 1 for centered, 2 for
tiled.
- ToolBarFontColor : the font color for controls (including buttons)
on the toolbar.
Linking Resources into your Application
The four graphic settings Wallpaper, ButtonCursor,
ToolBarBackground and CoolButton mentioned above can use graphics either
loaded off the disk, or graphics embedded in the application. If you have
a single app project then I recommend embedding the graphics - if you have
a Multi-App project, with a large number of your own DLL's then I
recommend reading some of the graphics off a disk. The reason for this is
that you'll have to embed the graphics in each app file where they are
used. For background graphics (especially the wallpaper) this can swell
the exe and DLL sizes by quite a lot. For the WMF and CUR files the size
is negligible. Also in some versions of Clarion Cursors have to be
embedded, and cannot be written off the disk.
When you are wanting to use a graphic file embedded in an app then simply
use the tilde character (~) in front of the name. e.g.
ButtonCursor=~Hand.Cur
To embed the graphic in the app file, go to the Project button, highlight
the section named Library, Object and Resource files and click on the Add
button. Type in the name, and path, of the graphic(s) here.
If you are reading the graphic file off the disk then make sure the
variable containing the path is set in the Makeover global extension in
the EXE application. If this is not set the graphics will attempt to load
from the current directory. You can also specify a path, as part of the
graphic name, in your ini file if you want.
Naming the INI File
You get to name the ini file on the Global extension
of the Exe. If you omit the path then the INI file is located in the Windows directory. Sample Style files are
installed in your \Clarion\Accessory\Images\Styles
directory when you install Makeover.
Themes
Tip: The White, Ash
and Silver themes are the ones which work best in modern, simple-looking
applications. You can use Makeover as a simple way to make your
application look better. Of course the next obvious step is to allow your
end user to select from a list of possible style files to choose the
'look' they like the best. This introduces the concept of a
Theme.
Simply put, a Theme is simply a Style file which gives your application a
particular look. For example a theme called "Ocean Blue" might give your
app a blue look. One called "Emerald Rain Forest" might be based on the
color green, and so on.
Makeover has a small code template to allow your customer to select a
Theme (called 'Select Makeover Theme'). Use this code template on a menu
item on your frame. There is an option to use the STY extension instead of
the INI extension if you like.
The Theme selected is stored in the Win.Ini file (or another INI file
stipulated in the Global Extension template), and is re-used next time the
application is started,
if the Remember Theme Setting is checked
on the global extension.
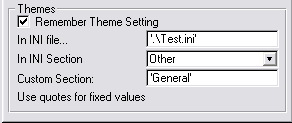
By default, the INI Section will be the Application name, but in some
cases (like in Multi-EXE or Multi-DLL applications) you might like to
stipulate a name that is common in all the applications that use this
theme setting.
To complete the picture, there is a code template which restores the Theme
to the default (global extension) setting.
Tip: If you are using this feature, then
it's a good idea to keep the style, and the graphics the style uses, in
the same directory. Assuming you do this, make sure you have the global
option
Graphics are stored in the Style Directory
ticked on. (See the docs for the global extension here.)
Examples
Makeover ships with the following examples
ABC
A simple, single EXE based on the ABC template chain
with the Makeover Global Extension
Legacy
A simple single EXE based on the Clarion template
chain, wit the Makeover Global Extension.
MultiDLLABC
A multi-app system, based on the ABC template chain.
Note the Makeover global extension added to all the apps.
MultiDLLLegacy
A multi-app system, based on the Clarion template
chain. Note the Makeover global extension added to all the apps.
Windows XP / Vista
Windows XP introduced the concept of a Manifest file.
This is basically a small text file that either resides in the same
directory as your EXE, or is linked into the EXE itself as a resource. If
it exists then your program will use the Windows XP style controls, when
running on XP, and Windows Vista style controls when running on Windows
Vista. Under earlier versions of Windows the file has no effect.
If the Manifest file is present then all your check boxes, radio buttons,
and progress bars will change to look like XP controls. Buttons without
Icons will also change to use Windows XP style buttons.
If the "Use XP on XP" switch is set (on the global Makeover extension)
then Makeover will disable the CoolButton feature (regardless of the
setting in your style file).
In later versions of Clarion it's possible to embed a manifest directly
into the program. This is done via the global properties, App setting tab,
Application Manifest button. A variety of manifests are possible in this
way.
Clarion 7+ with a Manifest
Clarion 7 changed the tabs used by the program to be
OS tabs rather than tabs Clarion itself draws. These OS tabs are used when
the program has a manifest (see above). In this combination the tabs
cannot be colored - they automatically (and only) take the colors of the
OS tab settings. In Clarion 7+ if you want colored tabs, you can't have a
manifest, and vice versa.
In Clarion 8+ this change has been somewhat relaxed, there is now an
option on the Application Manifest window to allow tabs to be colored. Go
to the Global Properties tab, Actions button, App Settings tab,
Application Manifest button, "SHEET controls do not use the OS Theme
Color" option.
For the Technically Minded
Note: This section is
optional and is not required reading...
Makeover is implemented as a class, and is added to your \Clarion\Accessory\LibSrc\Win
directory as MO.Clw and MO.Inc.
Although it is a class it can still be used in Clarion Legacy
applications.
The template declares an instance of the Makeover class in your program,
called ThisMakeover. The template initializes
the object on start-up by setting the Ininame property,
calling the GetColorDepth method to get the
current screen color depth, and then calls the Load
method with the name of the style to use.
On each screen, after the window is opened, the SetWindow
method is called with the appropriate window type.
Property Reference
| ColorDepth |
This contains the color depth of the machine that is currently
running. 1 is used for 16 colors, 2 for 256 colors, and 3 for more
than 256 colors. |
| Disable |
Suppresses calls to SetWindow,
SetXP, TakeEvent,
Refresh and SheetColor
effectively removing Makeover from running. |
| DisableGridColor |
Disables the ability to set the Grid Color in listboxes |
| DisableLineHeight |
Disables the ability to set the Line Height in list boxes. |
| GraphicsPath |
This contains the path where the graphics files (used for
wallpaper and coolbuttons) are stored. All Wallpaper and
CoolButton graphics, which are not marked as internal (using a ~)
and which do not have a fixed path, will automatically be
prepended with this property. See Linking
Resources into your application for details. |
| IniName |
This contains the name of the Ini file to use. This name is used
by the Load method. |
| ListBorderWidth |
Allows you to adjust the width of the border around rounded list
boxes. |
| NoButtons |
Disables Cool button features. |
| SetName |
The name of the Set as passed to the Load method. |
| XP |
If set to 1 then cool buttons are suppressed on XP and Vista. |
| XRes, Yres |
Set by the GetScreenRes method to the current screen resolution. |
The rest of the properties all contain the settings from the ini file.
These are used by the SetWindow method.
Methods :
| GetColorDepth |
Sets the ColorDepth property. 1 for 16 colors, 2 for 256
colors, 3 for more than 256 colors. |
| GetPath |
Returns the Path element from a path/file combination.
(Typically Command(0)). |
| GetScreenRes |
Gets the current screen resolution and stores it in Xres and
YRes. |
| GetSheet |
Finds the Sheet control on the window. |
| Load |
This method loads all the settings, for all the window types,
out of the ini file into memory. This is usually called near the
start of the program. |
| TakeEvent |
Watches the events from the window, and highlights the button
that will be "pressed" if the enter key is pressed |
| Refresh |
This method resynchronizes all the cool graphics with the
buttons. Thus if buttons move (like if the screen is resized - or
if buttons are hidden / unhidden then call this method to refresh
the cool graphics. |
| SetWindow |
Sets the open window with all the current Makeover settings. The
window type is passed, and used as an index to the respective
properties. These properties are all set by the Load method. |
| SetXP |
Sets the XP property. |
| SheetColor |
This method is called when the user changes from one Tab to
another. It's responsible for setting the color on the now
inactive tab, and for setting the color on the now active tab. |
Adding Makeover to Hand-Coded Projects
Note: This section is
designed for those hard-core programmers who hand-code their own projects.
It is definitely not required reading for most Clarion programmers.
- Add the Hand.Cur file, and mo.clw
file to your project.
- In the global data section of your project add the following code;
_ABCLinkMode_ Equate(1)
_ABCDllMode_ Equate(0)
Include('mo.inc')! note this comes
AFTER the 2 equates
ThisMakeOver MakeOver
Win:Browse Equate(1)
Win:Form Equate(2)
Win:Frame Equate(3)
Win:Window Equate(4)
Win:Lookup Equate(5)
Win:Wizard Equate(6)
Win:Process Equate(7)
Win:Report Equate(8)
Win:Background Equate(9)
Win:About Equate(10)
Win:Splash Equate(11)
Win:Viewer Equate(12)
Win:Other1 Equate(13)
Win:Other2 Equate(14)
Win:Other3 Equate(15)
Win:ToolBox Equate(16)
Win:Modal Equate(128)
- In the global code section of your project, before any windows are
opened, add the following code to initalise the Makeover object;
ThisMakeover.GraphicsPath =
ThisMakeover.GetExePath() ! assuming style in exe directory
ThisMakeover.IniName = 'name and path of style file.ini'
ThisMakeover.GetColorDepth()
ThisMakeover.Load('Basic' & ThisMakeover.ColorDepth)
- In each procedure, after opening a window add;
ThisMakeover.SetWindow(Win:Type)
Where Win:Type is one of the win: equates listed above.
4a) If the window is resizable, then you need to add the following
code when the window is resized (ie in the Sized
event);
ThisMakeover.Refresh(Win:Type)
Where Win:Type is the same WinType as used in step 4 above..
4b) If the window has a Sheet control, and you're wanting to implement
active/inactive tab colors then added the following to the data
section;
mo:SelectedTab Long
add the following to your code, just after opening the window, just
after the call to .SetWindow;
mo:SelectedTab = ThisMakeover.SheetColor(Win:Type,mo:SelectedTab,?Sheet)
and the following to your code, when the NewSelection
event is received for the sheet;
mo:SelectedTab = ThisMakeover.SheetColor(Win:Type,mo:SelectedTab,Field())
Common Mistakes when Hand-Coding:
- Adding the Include('Mo.Inc') code
before, not after, the _ABC_ equates. (see step 2 above)
- Not specifying the path when setting the Ini name. (see step 3
above.) Use .\ for "current" directory,
or ThisMakeover.GetExePath() to get the
application directory.
Compiler Errors
associated with Makeover
Check out general product
CompilerErrors.
- I just installed Makeover for the first time, then I tried
implementing it in my application, but now when I compile I get lots
of errors.
Answer: Have you closed, and reopened the
Clarion IDE since installing Makeover? This refreshes the classes.
- My Multi-DLL, Legacy APP, GPF's on start-up if Makeover is used.
Answer: Multi-DLL, Legacy apps are a special
Case. Go to the Project settings, Properties, then Defines. Add there;
_ABCDllMode_=>0
_ABCLinkMode_=>1
- I've upgraded Makeover, now when I compile my app I get No matching
prototype available
Answer: The Refresh method now takes a
parameter. If you have
ThisMakeover.Refresh()
in any hand-code then this will cause the compiler to spit the error
No matching prototype available
Change the code to read
ThisMakeover.Refresh(mo:WinType)
Frequently Asked Questions
I'm getting Compile Errors
Runtime Errors:
1.1.
I
think I've done it all right, but it doesn't seem to work. What did I do
wrong?
1.2.
When
I manually hide a button at runtime a 'ghost' remains behind. How do I
make the ghost disappear?
1.3.
I no longer have cool buttons. What happened?
1.4.
How do I make sure the graphics / style file load
from the application directory - even if this isn't the current
directory?
1.5.
On a form with lots of fields and tabs
I get excessive flickering
1.6.
The highlighted rows in my browse box are white on
white, hence invisible. Or some other combination of colors that's just
wrong.
Programming Queries:
2.1.
I
have a multiple app project, with many DLL's and 1, or more, Exe's. What
must I do?
2.2.
I
use PC Anywhere for remote support. I want to be able to turn off
Makeover because it slows down the modem.
2.3.
Is
it possible to embed everything in the .exe files ie graphics and style
ini config?
2.4.
Is it possible to override the transparency
setting for a control (like a panel)?
2.5.
I am wanting to get a toolbar that looks flat, with
flat buttons that have no visible outlines when not active.
2.6.
Makeover doesn't set my radios to transparent
2.7.
I don't want to restart the program to get the
effects back, is there any other way?
2.8.
How do I use CoolButtons for selected buttons only
(not for unselected buttons)?
2.9.
I have a window that opens before Makeover
initializes - how do I make Makeover initialize before the window?
General Queries:
3.1.
What
are the Other1, Other2, and Other3 window types for?
3.2.
I am importing a procedure from another Makeover
enabled application, but it creates a duplicate makeover extension. How
do I solve this?
3.3
When I use the Visual Indicators feature of the
Business Rules template, then my entry controls look weird.
0.1 Question: I've upgraded
Makeover, now when I compile my app I get No matching prototype available.
Answer: The Refresh method now takes a parameter. If you have
ThisMakeover.Refresh()
in any hand-code then this will cause the compiler to spit the error
"No matching prototype available"
Change the code to read
ThisMakeover.Refresh(mo:WinType)
1.1.
Question: I think I've done it all right, but it
doesn't seem to work. What did I do wrong?
Answer: Check the following;
- Is the computer set to be in Hi-Color (16bit / 65000 colors) or
TrueColor (24 bit / 16 M colors) or higher mode? It's in these modes
that you'll see the most dramatic effects. To check what mode you are
in go to Start menu | Settings | Control
Panel | Display | Settings Tab.
- Is your program using the correct 'Style' file? If the style file
does not exist where your program is looking for it then it will
automatically create an empty one for you. Check your hard drive for
'Style.Ini' (or any other name you might have used). If you run your
program with the command line switch /MakeoverDebug then you
will get a message on startup telling you where the Ini file is that
your program is using.
- Are the graphic files in the right place? If the graphic files are
not in the right place then they will not load. See Adding
Makeover to your application for more information on setting the
graphics path.
- Are the graphic files set to be internal in the style file (i.e. the
names are prepended with a ~) but they are not included in your
project part of your application? See Linking
Resources into your application for details.
- Is the window set as Modal? Cool Buttons are not available on Modal
windows.
1.2.
Question: I have a button on my screen which I
hide and unhide. When I hide it a 'ghost' remains behind. How do I make
the ghost disappear?
Answer: The cool button graphic control is at
?Button + 1000. So when you hide or unhide the button, hide or unhide the
graphic as well. e.g.
hide (?ok)
hide (?ok+1000)
OR
Answer: Make a call to
ThisMakeover.Refresh(mo:wintype). This is a new method in ver. 1.3 which
hides and unhides the Cool graphics, as well as repositions and resizes
them.
1.3. Question: I no longer
have cool buttons. What happened?
Answer: Check - that your cool button image is
still the same. These look like XP buttons, so you could be shipping a
manifest file with your application. Make sure that there is no
appname.exe.manifest file in your application directory.
1.4. Question:
How do I make sure the graphics / style file load from the application
directory - even if this isn't the current directory?
Answer: There are settings on the Global
extension which will do this for you. See
Adding
Makeover to your Application for more details.
1.5. Question:
On a form with lots of fields and tabs I get excessive flickering
Answer: This changes from one Clarion version to
the next, and from one Hotfix to the next.
- The first thing to do is turn on the option "Reduce Flicker".
(Global Extensions, Makeover, Settings tab) This should reduce the
flicker on most of the windows. On windows where there is still
flickering do the following;
- Go to the procedure with the problem. Go to the local Makeover
extension. To the "Overrides" tab. Set the window to not use any
wallpaper by setting Wallpaper to '' ( that's 2 single quotes.)
- Check that you have not used the DISPLAY() clarion command anywhere
in the init method before the ThisMakeover method calls that are in
the init method.
1.6 Question: The
highlighted rows in my browse box are white on white, hence invisible. Or
some other combination of colors that's just wrong.
Answer: A cosmetic bug was introduced into Clarion 6.3, build 9058. (PTSS
#12114). This causes the background color for list boxes to be set to
white if the list box is transparent. The easiest solution is to use Build
9056 until this bug is sorted out. If that is not possible then add
DisableLists=1
to all the sections in your Style file.
2.1.
Question: I have a multiple app project, with
many DLL's and 1, or more, Exe's. What must I do?
Answer:
- Add the Global Makeover Extension to all the apps (see Adding
Makeover to your Application)
- In all the Apps, go to the Multi-Dll tab and select " This app is
part of a Multi-DLL project.
2.2.
Question: I use PC Anywhere for remote support.
I want to be able to turn off Makeover because it slows down the modem.
Answer: There is a small code template which
does this for you. Simply add it to a menu item. This will disable the
Makeover effects in the current running application. The next time the
application runs the effects will be restored.
2.3.
QQuestion: Is it possible to embed everything in
the .exe files ie graphics and style ini config?
Answer: You can embed the graphics - you need to
put the tilder '~' in front of your reference to the graphics in the style
file, and make sure that you add the graphics to the project. However, you
cannot embed the style file - that needs to be an INI file. I guess what
you could do is create a style file programmatically - this would save you
from shipping the INI file. It would also recreate the stylefile every
time in case of tampering. For example (in your Program Setup global embed
point:
putini('Basic3
Browse','WallPaper','~wood.bmp','MyProg.sty')
putini('Basic3 Browse','WallPaperType',2,'MyProg.sty')
and so on...... (Check the
3rdparty\example\makeover\big\classic.ini file for more entries)
2.4. Question:
Is it possible to override the transparency setting for a control (like a
panel)?
Answer: Yes. You can do this in the local
extension template of that particular procedure. On the solid controls
tab, there is a list of controls that you can use to turn the transparency
off.
2.5. Question:
I am wanting to get a toolbar that looks flat, with flat buttons that have
no visible outlines when not active.
Answer: Unfortunately if you want to use the XP
Manifest, then you can't have flat buttons (because the buttons aren't
strictly transparent, they are simply drawn with the background colour of
the window. This means that the underlying graphic does not come through
from behind the button (but a grey colour - or whatever you've set the
background colour of the toolbar to be).
2.6. Question: Makeover
doesn't set my radios to transparent
Answer: If you have an icon on the radio or if
you're using a Clarion version < 6.1 and you have SetXP on, then it
won't set to transparent.
2.7. Question:
But I don't want to restart the program to get the effects back, is there
any other way?
Answer: Yes. There is a small code template to
re-enable the effects so you don't have to restart the program.
2.8. Question:
How do I use CoolButtons for selected buttons only (not for unselected
buttons)?
Answer:
In your style file, you'll find 2 style settings:
CoolButton=button.gif
CoolButtonSelected=buttonselected.gif
Set the CoolButton to nothing.
2.9. Question:
I have a window that opens before Makeover initializes - how do I make
Makeover initialize before the window?
Answer: In the '3rdparty' tab (global
extension), check the 'Initialize Makeover first (before other
accessories)' checkbox. This will ensure that Makeover is initialized
before your window.
3.1.
Question: What are the Other1, Other2, and
Other3 window types for.
Answer: Anything you want. They are there in
case you have other kinds of windows which require a different setting.
You don't have to use them if you don't need to.
3.2. Question:
I am importing a procedure from another Makeover enabled
application, but it creates a duplicate makeover extension. How do I solve
this?
Answer: You need to export your other
application to a text file, and then edit the text file and remove the
instances of the Makeover local extension template wherever it occurs. The
addition will look like this
[ADDITION]
NAME Makeover LocalMakeover
[INSTANCE]
INSTANCE 4
OWNER 3
[PROMPTS]
%
LocalTreat DEFAULT ('Default')
%
QueryLocalTreat DEFAULT ('Browse')
%
Solids MULTI LONG ()
%
Solid DEPEND %Solids DEFAULT TIMES 0
%
WallPaper DEFAULT ('')
%
WallPaperMode DEFAULT ('Stretched')
%
DisableCool LONG (0)
%
DisableHere LONG (0)
You will need to setup your local Makeover settings again after import
(because of removing the makeover local extension template.
3.3. Question: When I use
the Visual Indicators feature of the Business Rules template, then my
entry controls look weird.
Answer: Makeover creates a lot of the visual
effect by dynamically adding controls to your window. It uses a property
called
ControlOffset to determine the
numbering link between your controls and the style controls. This property
is set to 1000 by default. Unfortunately the Business Rules Template also
creates controls, and also uses a gap of 1000. So the two products clash.
Makeover allows you to change the offset. If you have a multi-app system
then you only need to do this in the EXE app. Go to the Makeover Global
Extension, to the Settings tab, Advanced section, and set the Control
Offset to, say 2000.
Requires Makeover version 2.81 or later.
Version History
Download latest version
here
Version 3.12 - 27 May 2025
Version 3.11 - 27 June 2022
- Change: Internal template variables in Global Extension changed from
%objectname and %classname.
Version 3.10 - 9 May 2022
- Change: Setting of Window{prop:buffer} to true removed. Setting
prop:buffer causes Spin boxes to have a "boxed" black line border.
Spin boxes always generate a border, so they can't have round borders,
but other than that they look ok.
- Removed: DOS file declaration for creating a Manifest. No longer
used.
Version 3.09 - 24 May 2021
- Add: Clarion 11.1 to install.
Version 3.08 (18 Sept 2018)
- Add: Clarion 11 to install.
Version 3.07 (11 July 2017)
- Fix: Rounded List Borders did not correctly resize when doing a
.Refresh.
Version 3.06 (6 February 2017)
- Fix: Hiding a list control, then Calling .Refresh, did not hide the
list background box control.
Version 3.05 (7 July 2015)
- Examples folder update.
- "Ini file is located in the application directory" - default changed
to on.
- "Graphics are stored in the style directory" - default changed to
on.
- Consolidated Style files to use the [Default] section.
- New style "White" added.
Version 3.04 (25 February 2015)
Version 3.03 (4 December 2014)
- Support for ResizeAndSplit added.
- Minor performance improvements to Refresh method
- Added support for Required and ReadOnly properties of a field to
change, and be updated via a call to .Refresh.
- If "Use XP buttons" set then button FLAT, TRN and COOL settings are
ignored.
- Added ButtonIconJustification setting in style file - possible
values are left, right, center
- Added ListJustification setting in style file - possible values are
left, right, center, decimal, left right, right left
- Added ListJustificationLeftOffset setting in style file/li>
- Added ListJustificationRightOffset setting in style file
- Added ListJustificationCenterOffset setting in style file
- Added ListJustificationDecimalOffset setting in style file
- Added ListHeaderJustification setting in style file - possible
values are left, right, center, decimal
- Added ListHeaderJustificationLeftOffset setting in style file
- Added ListHeaderJustificationRightOffset setting in style file
- Added ListHeaderJustificationCenterOffset setting in style file
- Added ListHeaderJustificationDecimalOffset setting in style file
- Add : Allow "BINDed" variables to be used in Graphics Path,
surrounded by %.
- Fix: SetWindow preserved prop:pixels setting.
- Add: Support for DrawHeader settings to be in Style file.
Version 3.02 :
Version 3.01 :
- Change: Setting toolbar properties from procedures other than the
Frame could cause screen repaint problems.
Version 3.00 :
- Add: various properties.
- Update: Added ability to simplify style file by using Default
section.
- Removed 16bit and pre Clarion6 omit code
Version 2.99 : Released 30 July 2013
- Update: Updated to Cape Template 4.04 ; better Legacy support in C6.
Version 2.98 : Released 14 May 2013
- Update: Installer detects Clarion 9
Version 2.97 : Released 14 March 2013
- Changed to Ver4 object/template management system. IMPORTANT
READ
THIS.
- Add: support for Multi-Proj in C8
Version 2.96 : Released 23 January 2013
- Add: Trace method
- Fix: Remove variable ds declared in module.
Version 2.95 : Released 16 November 2012
- Fix: Conditional compile added to bypass Layout support in Clarion
5.5. (C5.5 does not support prop:layout).
Version 2.94 : Released 8 November 2012
- Fix: Removed duplicate warning errors.
Version 2.93 : Released 9 October 2012
- Change: Implemented Cape.Tpw object generation template.
Version 2.92 : Released 19 October 2011
- Fixed default setting if ListSelectedFontColor property was
color:none.
Version 2.91 : Released 11 January 2010
- Changed %ININame template field to avoid name clash.
Version 2.90 : Released 24 November 2010
- Handled case where mo:WinType declaration was being generated twice
in some CPCS procedures.
Version 2.89 : Released 17 February 2010
- Added support for Layout property so window layout can be set via
style file. (update: suppressed in 2.95 for C55 users.)
Version 2.88 : Released 19 June 2009
- Added ComboBox to list of controls altered by SelectedEntryColor
property.
SelectedEntryColor now affects Text, Entry, Spin and Combo controls.
Version 2.87 : Released 12 February 2009
- Added ListFontColor property
- Corrected Styler app so it will compile. (the source app for Styler
is included in \clarion\3rdparty\source\makeover)
Version 2.86 : Released 11 November 2008
- Clarion 7 compatible install.
- Template change - Allow Makeover to be initialized first (in Program
Setup).
Version 2.85
- Minor tweak to handle CoolButtons template change by PurpleSwift.
Version 2.84 : Released 28 April 2008
- Fix: Template version number was not incremented for the last couple
of versions.
Version 2.83 : Released 23 April 2008
- Fix: Radio buttons with icons respect CoolButtons setting in style
file.
Version 2.82 : Released 7 April 2008
- Fix %WinType variable declaration error when disabling Makeover
globally.
Version 2.81 : Released 4 March 2008
- Added ControlOffset property. This sets the offset between the
screen control and the associated "style" control. This property
defaults to 1000. However the Business Rules template also creates
extra controls, and also uses an offset of 1000. If you are using the
Business Rules template in your app then set this property (Exe App
only, Global Extension, Settings Tab,) to 2000. If you have used 1000
in your hand-code anywhere (e.g.
(?Button1+1000){prop:hide} = 1
then replace this with
(?Button1+ThisMakeover.ControlOffset){prop:hide} = 1
Version 2.80 : Released 4 December 2007
- Fix: Entry, Text, Spin and Combo fields did not have correct
background color applied if DisableEntries was set.
Version 2.79 : Released Sept 6, 2007
- Change: Made mo:WinType a variable instead of an equate. This allows
for changes to the procedure style at runtime.
- Add: A checkbox to the local extension. "If Browse called as Lookup,
use Lookup Style". If on the browse will use the browse style, or
lookup style, depending on the nature of the call to the browse.
- Add: Docs for Local Extension Options
Version 2.78 : Released Aug 30, 2007
- Fix: Support for Legacy Process procedure in CPCS
- Fix: Contents page of docs was missing some headings.
Version 2.77 : Released August 10, 2007
- CHANGE: The ListLineHeight item in
the style file has been changed from Pixels to DialogUnits. This may
mean you need to edit your style if you've used this setting.
- ListSelectedFontColor item added to style (defaults to windows theme
color).
- ListSelectedFile color defaults to windows theme color (not just
blue).
- Small fix for CPCS support
- DisableLists item added to style so you can turn off list support if
you like.
- Added ListBorderWidth property.
Version 2.76 : Released July 5, 2007
Important Note: Tearoff version 1.89 or later
required.
- NOTE: The Refresh method now takes a
parameter. If you have
ThisMakeover.Refresh()
in any hand-code then this will cause the compiler to spit the error
"No matching prototype available"
Change the code to read
ThisMakeover.Refresh(mo:WinType)
- Re-Activated new features, and fixed resizing bugs
- Moved "Use XP on XP" from Advanced tab to Settings tab.
- Updated Docs
Our thanks go to Kevin Plummer, Lynn Howard, John Sarver, Mike Loney and
others who have assisted with testing this release.
Version 2.74 : Released June 19, 2007
- Fix for resizing regressions introduced in 2.70
- Fix for compile failure in 9050 introduced in 2.70
- Removed some features introduced in 2.70 for further testing before
implementation.
Version 2.73 : Released May 17, 2007
- Fix for controls position/resizing problem (prop:pixels not being
reset in some cases).
- Fix for entry controls that are already transparent (template option
to override entries that are transparent).
Version 2.72 : Released May 14, 2007
- Fixed regression in 2.70 in resizing of list control.
- Fixed regression in 2.70 in drop list/combo (no icon for the drop
button).
- ToolbarFontColor is now read from the style file.
- Fix for KeepingTabs compatibility (lineheight and gridcolor).
- Fix for resizing of controls > 1000 (where controls could be
overlapped).
- New property - allows selected controls to be highlighted (new
property in style file).
Version 2.71 : Released May 8, 2007
- Fixed regression in 2.70 - using %cwtemplateversion too early.
Version 2.70 : Released April 18, 2007
- Fixed compile for Multi-DLLs (regression in 2.64 when making class
non-ABC compliant).
- Fix buttons for Vista support.
- List LineHeight and GridColor support in list boxes.
- Entry fields get rounded corners.
- More efficient handling of disabled controls (disable property stops
window(s) from interacting with Makeover at all).
- Template - Associate local template with template chain.
- Template - check window definition exists before trying to apply a
wallpaper.
Version 2.67 : Released November 13, 2006
- Feature - allow theme to be stored in a specified section of an INI
file (this allows multi-dll and/or multi-EXE projects to have the same
settings stored in the same file and section).
Version 2.66 : Released 13 October 2006
- Fix for Fix in 2.65 (integration with TearOff (when TearOff is
disabled)) - logic not correct.
Version 2.65 : Released 12 October 2006
- Fix for integration with TearOff (when TearOff is disabled).
Version 2.64 : Released 11 September 2006
- Fix for crashing legacy application (made methods virtual).
- Made the class non-ABC compliant.
Version 2.63 : Released 28 August 2006
- Remove spurious 10,13 character in the mo.inc file.
Version 2.62 : Released 27 June 2006
- Fix regression for multi-DLL applications (required mo.exp included
in the install).
- Added ,once where required when including the mo.inc file into your
applications.
Version 2.61 : Released 14 June 2006
- Added Local Variable mo:WinType which is an equate indicating the
WinType equate that makeover will use to style the window (see the
equates listed in the Adding Makeover to
Hand-Coded Projects section of this doc)
Version 2.60 : Released 10 November 2004
- Improved support for Clarion 6.1
- Added "Reduce Flicker" global, and local template option
- Added "Silver" style.
Version 2.52 : Released 16 September 2003
- Documentation Changes
- Added ability to override theme setting ini file (Themes tab)
- Added support for Ingasoft's Easy-Resize-And-Split
Version 2.5 : Released January
2003
- IMPORTANT NOTE FOR SECWIN USERS: If
you are using Secwin between version 3.1 and 3.19 then you MUST
upgrade to Secwin 3.2 or later. Secwin 3.1x contains a reference to
the Makeover object internally, which is not compatible with Makeover
2.5. Click here
to download the latest version of Secwin.
- Added support for Windows XP manifest
files
- Added support for Default Cool Buttons.
This means that the button which will be pressed, if the user presses
ENTER, is visually identifiable.
- Added better support for transparent sheets
- Fixed problem of windows ghosting on Windows NT etc.
- Updated Styler utility.
- Added new Smooth, Pastel
and Shop styles. Also Classic2,
a slight variation on Classic.
- Added the Style
Gallery to the web site. Use this to preview some of the styles.
- Clarion 4 Support Dropped : This version makes use of Clarion 5
language features. With the imminent release of Clarion 6, support of
Clarion 4 is being phased out.
- Added new global switch Graphics
are stored in the Style Directory. This makes it easier to
change from one style to the next. Recommended for programs using Themes.
Version 2.1 : Released June 2002
- Added support for Legacy Process procedures
- Remembers Disabled / Enabled status
- Clears Toolbar background when disabled
Version 2.0 : Released May 20 2000
- Added Styles collection (around 10 new styles)
- Major enhancements to Styler, including; multi-level undo,
recent style remembering, improved interface, custom color dialog,
Cut-&-Paste, Shiplist and support for the new properties.
- Added a new window style "Toolbox".
- Added property for "required entry box color"
- Added property for "Toolbar font color"
- Added property for "On Tab Font Color"
- Removed "Font Color" property (wasn't being used...See TextFontColor
property)
- Refinements to the template interface
- Added support for the CapeSoft TearOff template
Version 1.4 : Released August 15 1999
- Fixed bug with detecting the color depth in NT SP 4 and later
- Does not apply cool buttons to 'Modal' screens.
- 'Option' boxes are not made transparent - helps with windows 'line
through option' bug.
- Window Font Color added.
- Button Font Color added.
- Simplified Load method
- Wizard Sheet Controls use Active Tab color, instead of Inactive Tab
Color.
- Implemented C3PA Install Standards.
Version 1.3 : Released April 5 1999
- Added Makeover.Resize method to support screen resizing.
- Embed points added just before, and just after the call to
Makeover.SetWindow
- Button added to Local Makeover extension to allow 'solid' (i.e.
non-transparent) controls
- Button added to Local Makeover extension to allow a specific window
background.
- Added Toolbar Graphic Background support for Frame procedures.
- Added support for Tab Font settings (courtesy of Steve Lewis,
Aphelion Software)
- Added support for Transparent Sheets (courtesy of Steve Lewis,
Aphelion Software)
- Added support for Cool Checkboxes & Cool Radio Buttons.
- Updated Styler to include new options
- Added ability to turn Makeover on and off at runtime.
- Added code template to let end-user select Theme.
Version 1.2 : Released March 2 1999
- Added code to support GraphicsPath without a trailing \
- Changed the Auto-Detect feature to support non-standard screen
cards.
- Auto-Detect now supports 16-bit.
- Added more support for ABC Select buttons which hide!
- Fixed "Save-As" in Styler.
- Fixed 'Graphics in Application Directory' feature.
Version 1.1 : Released Feb 27 1999
- Improved support for ABC multi-Dll projects
- Included missing Mo.Exp file in install set.
- Added code to support Modal Windows. Cool Buttons are not available
on Modal windows.
- Added support for 3rd Party window procedures.
- Added FAQ question about 'Ghost' buttons
- Added support for ABC Select buttons which hide.
Version 1.0 : Released Feb 18 1999